
 search
I/N:
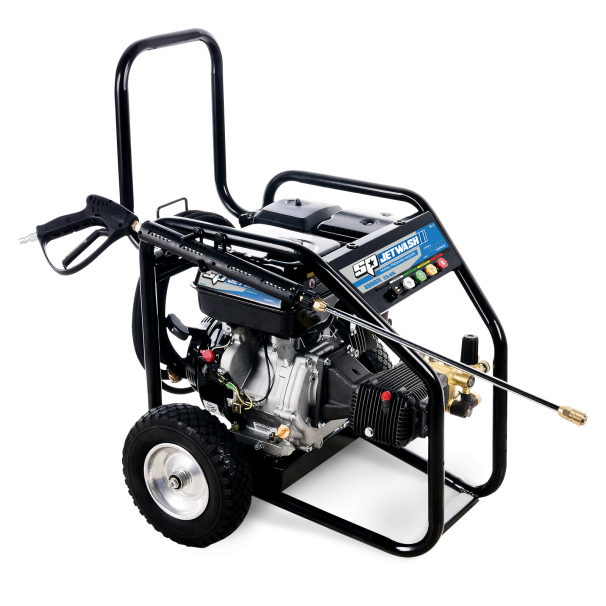
SP400P
PRESSURE WASHER PETROL 15HP SP JETWASH
$2665
access_time
Hurry!
10 left in stock
10 left in stock
PAY OPTIONS

Commercial Petrol Pressure Washer
- 4000 Max PSI
- 23.4 Litres Per Minute
- 15HP
- Brass Head 3 Piston Crank Shaft Pump
- Powered by Torini Engines INCLUDES:
- Steel Lance and Turbo Nozzle
- 5 Quick Connect Nozzles
- 10m HP Double Steel Braided Hose with Q
Choose and buy tools by browsing through our huge range of high-quality tools. Shop securely with Visa, Paypal or ZIP Pay
Additional 10% discount on 1st purchase by new customers. Sign-Up and avail the offer. Use code: NEW10 while creating new account. No minimum purchase. Get the best deals. Use buy now and pay later along with interest-free monthly repayments by paying through Zip Pay.
Huge range of tools available from big Australian brands. Highest quality tools by Gearwrench, SP Tools, Crescent and many more. Explore the list of Brands we got for you.
Brand
SPTools
User Manual HTML

SP400P
Do not operate equipment until you have read this Owner’s Manual for Safety,
Operation, and Maintenance Instructions.
CONTENTS |
|
|
Page |
Index |
2 |
General Components--------------------------------------- |
3 |
Technical Specifications |
4 |
Safety Guidelines---------------------------------------- |
5 |
Operating Procedures |
|
Assembly-------------------------------------------------------- |
8 |
Preparing Pressure Pump |
9 |
Adding Engine Oil |
10 |
Refueling--------------------------------------------------------- |
11 |
Before Use---------------------------------------------------------- |
13 |
Getting Started------------------------------------------------------ |
14 |
High Pressure Operation |
15 |
Detergent Operation |
16 |
Pump Maintenance |
|
Nozzle Cleaning |
18 |
Water Inlet Screen Cleaning |
18 |
Pump Oil------------------------------------------------------ |
19 |
19 |
|
Engine Instructions |
|
Engine Maintenance----------------------------------------------- |
20 |
Trouble Shooting---------------------------------------------- |
21 |
Limited Warranty Policy |
23 |
Limited Engine Warranty Policy |
24 |
2

Components:
1. |
Nozzle cleaner |
|
2. |
Quick releases nozzles |
6 |
|
|
|
3.Lance assembly
4.Trigger gun assembly
5.High pressure hose
6.Turbo Nozzle QD
7.Detergent pickup hose
8.Owner’s manual
7 |
8 |
|
|
3

Technical Specifications:
ENGINE
Torini |
|
Industrial Engine Model |
TR420 |
|
|
|
|
|
|
Type |
|
Forced Air Cooling, OHV |
4 Stroke |
|
|
|
|
|
|
Spark Plug |
|
NGK |
BPR4ES |
|
|
|
|
||
Lubrication |
SAE 30 (SAE 10W30 for cold climates) |
Engine Oil |
||
Engine oil was drained at the factory for shipping |
||||
|
|
|||
|
|
|
|
|
Oil Quantity |
|
Engine Oil Capacity |
1100ml |
|
|
|
|
||
Power |
Max Output power & revolutions kW/rpm |
5.1kW @ 3600 |
||
|
|
|
|
|
Ignition |
|
TCI (Transistor Controlled Ignition) |
TCI |
|
|
|
|
|
|
Fuel |
|
Unleaded Petrol |
Regular |
|
|
|
|
|
|
|
|
|
|
|
|
∙ |
Brass Pressure head |
|
|
|
∙ |
Anodized crankcase |
|
|
PUMP |
∙ |
Pressure adjustment |
|
|
∙ |
3WZ1807A |
|||
|
∙ |
Inbuilt Thermal relief valve |
||
Triplex |
|
|||
∙ Chemical injector (dosage rate 7:1) |
|
|||
|
|
|||
|
∙ Triple Stainless Steel Valves |
|
||
|
∙ |
Ceramic Pistons |
|
|
|
|
|
|
|
Oil Type |
|
SAE 30 Engine Oil |
600ml |
|
The pump is supplied with oil from the factory |
||||
|
|
|||
|
|
|
|
|
Pressure |
|
Maximum pump pressure |
3300 psi |
|
|
(228 bar) |
|||
|
|
|
||
|
|
|
|
|
Flow Rate |
|
Maximum water volume |
1404 ℓ/h |
|
|
23.4 ℓ/min |
|||
|
|
|
||
|
|
|
|
|
Recommended |
|
Water supply pressure |
@ 20psi |
|
|
|
|
|
|
4

SAFETY
This manual contains information that is important for you to know and understand. This information relates to protecting YOUR SAFETY and PREVENTING EQUIPMENT PROBLEMS. To help you recognize this information, we use the symbols below. Please read the manual
and pay attention to these sections. SAVE THESE DEFINITIONS/INSTRUCTIONS.
DANGER indicates an imminently hazardous situation which, if not avoided, will result in death or serious injury.
CAUTION indicates a potentially hazardous situation which, if not avoided, may result in minor or moderate injury.
WARNING indicates a potentially hazardous situation which, if not avoided, could result in death or serious injury.
CAUTION used without the safety alert symbol indicates a potentially hazardous situation which, if not avoided, may result in property
damage.
IMPORTANT SAFETY INSTRUCTIONS:
IMPROPER OPERATION OR MAINTENANCE OF THIS PRODUCT COULD RESULT IN SERIOUS INJURY, DEATH AND OR PROPERTY DAMAGE. READ AND UNDERSTAND ALL WARNINGS AND OPERATING INSTRUCTIONS BEFORE USING.
HAZARD |
|
WHAT CAN HAPPEN |
|
HOW TO PREVENT IT |
|||||
|
|
|
|
|
|||||
|
Spilled gasoline and its vapors can |
Shut off engine and allow it to cool |
|||||||
|
|
become ignited from cigarette sparks, |
|
before adding fuel to the tank. |
|||||
|
|
electrical arcing, exhaust gases, and hot |
Use care in filling tank to avoid |
||||||
|
|
engine components such as the muffler. |
|
spilling fuel. Move pressure washer |
|||||
|
Heat will expand fuel in the tank which |
|
away from fueling area before starting |
||||||
|
|
could result in spillage and possible |
|
engine. |
|
|
|||
|
|
fire explosion. |
|
|
Keep maximum fuel level 1/2” below |
||||
|
Operating the pressure washer in an |
|
top of tank to allow for expansion. |
||||||
|
|
explosive environment could result in a |
Operate and fuel equipment in well |
||||||
|
|
fire. |
|
|
|
|
ventilated areas free from obstructions. |
||
|
Materials placed against or near the |
|
Equip areas with fire extinguishers |
||||||
|
|
pressure washer can interfere with its |
|
suitable for gasoline fires. |
|||||
|
|
proper ventilation features causing |
Never operate pressure washer in an |
||||||
|
|
overheating and possible ignition of the |
|
area containing dry brush or weeds. |
|||||
|
|
materials. |
|
|
|
Always keep pressure washer a safe |
|||
|
Muffler exhaust heat can damage |
|
distance away from surfaces (such as |
||||||
|
|
painted surfaces, melt any material |
|
houses, automobiles, or live plants) |
|||||
|
|
sensitive to heat (such as siding, |
|
that could be damaged from muffler |
|||||
|
|
plastic, rubber, or vinyl), and damage |
|
exhaust heat. |
|
|
|||
|
|
live plants. |
|
|
Store fuel in container approved for |
||||
|
Improperly stored fuel could lead to |
|
gasoline, in a secure location away |
||||||
|
|
accidental |
ignition. |
Fuel |
improperly |
|
from work area. |
|
|
|
|
secured could get into the hands of |
|
|
|
|
|||
|
|
children or other unqualified persons. |
|
|
|
|
|||
|
|
|
|
|
|||||
|
Breathing exhaust fumes will cause |
Operate pressure washer in a well |
|||||||
|
|
serious injury or death. |
|
|
ventilated area. Avoid enclosed areas |
||||
|
Some |
cleaning |
fluids |
contain |
|
such as garages, basements, etc. |
|||
|
|
substances which could cause injury to |
Never operate unit in a location |
||||||
|
|
skin, eyes, or lungs. |
|
|
|
occupied by humans or animals. |
|||
|
|
|
|
|
|
Use only cleaning fluids specifically |
|||
|
|
|
|
|
|
|
recommended for |
high pressure |
|
|
|
|
|
|
|
|
washers. |
Follow |
manufacturer’s |
|
|
|
|
|
|
|
recommendations. |
|
|
|
|
|
|
|
|
|
|
|
|
5

HAZARD |
|
WHAT CAN HAPPEN |
|
HOW TO PREVENT IT |
|
|
|
|
|
|
|
|
Unsafe operation of your pressure |
Become familiar with the operation |
|||
|
|
washer could lead to serious injury or |
|
and controls of the pressure washer. |
|
|
|
death to you or others. |
Keep children away from the pressure |
||
|
The spray gun/wand is a powerful |
|
washer at all times. |
|
|
|
|
cleaning tool that could look like a toy |
Never attempt to defeat the safety |
||
|
|
to a child. |
|
features of this product. |
|
|
Reactive force of spray will cause |
Do not operate machine with missing, |
|||
|
|
gun/wand to move and could cause the |
|
broken, or unauthorized parts. |
|
|
|
operator to slip or fall, or misdirect the |
Never leave wand unattended while |
||
|
|
spray. Improper control of gun/wand |
|
unit is running. |
|
|
|
can result in injuries to self and others. |
Keep work area free of obstacles. |
||
|
|
|
Stand on a stable surface and grip |
||
|
|
|
|
gun/wand firmly. Expect the gun to |
|
|
|
|
|
kick when triggered. |
|
|
|
|
|
|
|
|
Spray directed at electrical outlets or |
Unplug any electrically |
operated |
||
|
|
switches, or objects connected to an |
|
product before attempting to clean it. |
|
|
|
electrical circuit, could result in a fatal |
|
Direct spray away from electric outlets |
|
|
|
electrical shock. |
|
and switches. |
|
|
|
|
|
|
|
|
|
|
|
|
|
|
Your washer operates at fluid pressures |
Never place hands in front of nozzle. |
|||
|
|
and velocities high enough to penetrate |
Direct spray away from self and others. |
||
|
|
human and animal flesh, which could |
Never hold onto the hose or fittings |
||
|
|
result in amputation or other serious |
Do not allow hose to contact muffler. |
||
|
|
injury. Leaks caused by loose fittings |
Never attach or remove wand or hose |
||
|
|
or worn or damaged hoses can result in |
|
fittings while system is pressurized. |
|
|
|
injection injuries. DO NOT TREAT |
Use only hose and high pressure |
||
|
|
FLUID INJECTION AS A SIMPLE |
|
accessories rated for pressure higher |
|
|
|
CUT! See a physician immediately! |
|
than your pressure washer’s psi. |
|
|
Spray can splash black or propel |
To relieve system pressure, shut off |
|||
|
|
objects. |
|
engine, turn off water supply, and pull |
|
|
|
|
|
gun trigger until water stops flowing. |
|
|
|
|
Always wear eye protection |
|
|
|
|
|
Never attempt to drink from the high |
||
|
|
|
|
pressure lance. |
|
|
|
|
Always be certain spray gun, nozzles |
||
|
|
|
|
and accessories are correctly attached. |
|
|
|
|
|
|
|
|
|
|
|
|
|
|
Use of acids, toxic or corrosive |
Do not use acids, gasoline, kerosene, |
|||
|
|
chemicals, poisons, insecticides, or any |
|
or any other flammable materials in |
|
|
|
kind of flammable solvent with this |
|
this product. Use only household |
|
|
|
product could result in serious injury or |
|
detergents, cleaners and |
degreasers |
|
|
death. |
|
recommended for use in pressure |
|
|
|
|
|
washers. |
|
|
|
|
Wear protective clothing to protect |
||
|
|
|
|
eyes and skin from contact with |
|
|
|
|
|
sprayed chemicals. |
|
|
|
|
|
|
|
6

HAZARD |
|
WHAT CAN HAPPEN |
|
|
|
|
HOW TO PREVENT IT |
|
|||||||
|
|
|
|
|
|
||||||||||
|
Contact with hot surfaces, such |
as |
During operation, touch only the |
||||||||||||
|
|
engine’s |
exhaust |
components, |
could |
|
control surfaces of the pressure washer. |
||||||||
|
|
result in serious burns. |
|
|
|
|
Keep children away from the pressure |
||||||||
|
|
|
|
|
|
|
|
|
washer at all times. They may not be |
||||||
|
|
|
|
|
|
|
|
|
able to recognize the hazards of this |
||||||
|
|
|
|
|
|
|
|
|
product. |
|
|
|
|
|
|
|
|
|
|
|
|
|
|
|
|
||||||
|
|
|
|
|
|
|
|
|
|
||||||
|
Fuel or oil can leak or spill and |
could |
If |
pressure |
washer |
is |
equipped with |
||||||||
|
|
result in fire or breathing |
hazard, |
|
|
a fuel |
turn the |
valve |
|||||||
|
|
serious injury or death. Fuel |
|
or oil |
|
to |
the |
|
off |
position |
before |
||||
|
|
leaks will damage carpet, |
paint |
|
or |
|
transporting to avoid fuel leaks. If |
||||||||
|
|
other surfaces in vehicles |
or |
|
|
|
pressure washer is not equipped with a |
||||||||
|
|
trailers. |
|
|
|
|
|
|
fuel |
||||||
|
|
|
|
|
|
|
|
|
tank before |
transporting. |
Only |
||||
|
|
|
|
|
|
|
|
|
transport fuel in an |
OSHA |
|
||||
|
|
|
|
|
|
|
|
|
approved container. Always place |
||||||
|
|
|
|
|
|
|
|
|
pressure washer on a protective |
mat |
|||||
|
|
|
|
|
|
|
|
|
when |
transporting |
to |
protect |
|||
|
|
|
|
|
|
|
|
|
against damage to vehicle from leaks. |
||||||
|
|
|
|
|
|
|
|
|
Remove pressure washer from vehicle |
||||||
|
|
|
|
|
|
|
|
|
immediately upon arrival at your |
||||||
|
|
|
|
|
|
|
|
|
destination. |
|
|
|
|
||
|
|
|
|
|
|
|
|
|
|||||||
|
Starter |
and other |
rotating |
parts |
can |
Never operate pressure washer without |
|||||||||
|
entangle hands, hair, clothing or accessories |
protective covers. |
|
|
|
|
|||||||||
|
|
|
|
|
|
|
|
Don not wear loose clothing, jewelry or |
|||||||
|
|
|
|
|
|
|
|
anything that may be caught in the starter or |
|||||||
|
|
|
|
|
|
|
|
other rotating parts. |
|
|
|
||||
|
|
|
|
|
|
|
|
Tie up long hair and remove jewelry. |
|||||||
|
|
|
|
|
|
|
|
|
|
|
|
|
|
|
|
The powerful spray from your pressure washer is capable of causing damage to surfaces such as: wood, glass, automobile paint, auto striping and trim, and delicate objects such as flowers and shrubs. Before spraying, check the item to be cleaned to assure yourself that it is strong enough to resist damage from the force of the spray. Avoid the use of the concentrated spray stream except for very strong surfaces like concrete and steel.
∙Operating unit with the water supply
∙You should never run your pressure washer for more than 2 minutes without pulling the trigger. Pulling the trigger allows cool water to enter the pump and maintains a normal operating temperature.
Read Owner’s Manual. Do not operate equipment until you have read Operation Manual for Safety, Operation, and Maintenance Instructions. Damage caused by incorrect operation will not be covered under warranty.
7

Assembly:
Unpacking Pressure Washer
∙Set carton on a rigid, flat surface. Remove all loose parts and packing. Leave pressure washer in carton.
∙Using a box cutter carefully open the carton completely by cutting the four corners, allowing the sides to lay flat. Leave pressure washer on carton while installing wheels and rubber feet.
Assembling the Wheels
∙Fit the axles into the axle ports as shown,
∙Secure the wheels to the axles with nyloc nut and washer.
NOTE: Do not over tighten the nuts; the wheels must be able to rotate freely.
Assembling the Rubber Feet
∙Fit the rubber feet to the legs as shown with nuts and washers provided.
Assembling the Gun/ Hose Hook
∙Fit the hooks into the position shown and
secure using the washers and nuts on the bracket.
8

Preparing Pressure Pump:
The pressure pump has a shipping plug inserted into the opening for the pump breather plug.
Failure to remove shipping plug and replace it with the breather plug will cause permanent damage and void warranty.
1.Remove the shipping plug, using a 17mm
2.Remove pump breather plug from parts bag and insert it into pressure pump.
3.Tighten pump breather plug securely by hand. Do not use a spanner or socket to tighten
4.Check sight glass to ensure pump oil is full, (half way up the sight glass).
5.If low, add oil to pump.
Recommended oil types:
∙Use SAE 10W/30 or 15W/40 Non detergent oil, SF, SG,SH, SJ, or higher.
9

Adding Oil to the Engine:
Engine oil is a major factor affecting engine performance and service life.
Place the Pressure Washer on a level surface.
1.Remove the oil filler cap and wipe the dipstick clean.
2.Check the oil level by inserting the dipstick into the filler neck without screwing it in.
3.If the level is low, add the recommended oil to the upper mark on the dipstick.
∙Remove the oil bung/dipstick and fill the sump through the
Never attempt to add oil to the engine while it is running. Hot oil may splash on your face or hands causing serious injury.
Use
Recommended oil types:
∙For operation in Hot climates +10˚C to 40˚C use SAE 30
∙For cooler climates operation
-API grade CC or CD
-API grade CC or CD
Oil Alert System
The oil alert system is designed to prevent engine damage caused by an insufficient amount of oil in the crankcase. Before the oil level in the crankcase can fall below a safe limit, the oil alert system will automatically shut down the engine (the engine switch will remain in the ON position). The oil alert system shuts down the engine and the engine will not start. If this occurs, first check engine oil.
10

Refueling Recommendations:
1.Refill the tank if the fuel level is low. Do not fill above the shoulder of the fuel strainer.
2.Avoid the generator stopping by running out of fuel, power variations will occur.
∙Gasoline is extremely flammable and is explosive under certain conditions.
∙Refuel in a
∙Do not overfill the fuel tank (there should be no fuel in the filler neck). After refueling, make sure the tank cap is closed properly and securely. Be careful not to spill fuel when refueling. Spilled fuel or fuel vapor may ignite. If any fuel is spilled, make sure the area is dry before starting the engine.
∙Avoid repeated or prolonged contact with skin or breathing of vapor.
KEEP OUT OF REACH OF CHILDREN.
Fuel type
Only use regular unleaded fuel. The fuel should be fresh, filtered cleanly and care taken not to let any dust or water enter the fuel tank. Otherwise the filters and carburetor may be blocked or damaged.
Use gasoline with a pump octane rating of 86 or higher. We |
|
recommend unleaded gasoline because it produces fewer engine |
UPPER FUEL LEVER |
and spark plug deposits and extends exhaust system life. |
|
Never use stale or contaminated gasoline or oil/gasoline mixture. |
|
Avoid getting dirt or water in the fuel tank. |
|
Occasionally you may hear light “spark knock” or “p inging” (metallic |
|
rapping noise) while operating under heavy loads. This is no cause |
|
for concern. |
|
If spark knock or pinging occurs at a steady engine speed, under |
|
normal load, change brands of gasoline. If spark knock or pinging |
|
persists, see an authorized generator dealer. |
|
Oxygenated Fuels
Some gasoline’s are blended with alcohol or an ether compound to increase the octane. These types of gasoline are collectively referred to as oxygenated fuels. Some areas use oxygenated fuels to help meet clean air standards. If you use an oxygenated fuel, be sure its pump octane rating is 86 or higher.
Ethanol (ethyl or grain alcohol)
Gasoline containing more than 10% ethanol by volume may cause starting or performance problems. Gasoline containing ethanol may be marketed under the name “Gasohol”.
11

Methanol (methyl or wood alcohol)
Gasoline containing methanol must contain
MTBE (methyl tertiary butyl ether)
You may use gasoline containing up to 15% MTBE by volume. Before using an oxygenated fuel, try to confirm the fuel’s contents. Some states (provinces in Canada) require this information to be posted on the pump. If you notice any undesirable operating symptoms, switch to a conventional unleaded gasoline. Fuel system damage or performance problems resulting from the use of an oxygenated fuel are not our responsibility and are not covered under warranty.
Oxygenated fuels can damage paint and plastic. Be careful not to spill fuel when filling your fuel tank. Damage caused by spilled fuel is not covered under warranty.
Running the engine with persistent spark knock or pinging can cause
engine damage. Running the engine with persistent spark knock or pinging
is misuse, and the Distributor’s Limited Warranty does not cover parts
damaged by misuse.
High Altitude Operation
∙At high altitude, the standard carburetor
∙High altitude performance can be improved by installing a smaller diameter main fuel jet in the carburetor and readjusting the pilot screw. If you always operate the engine at altitudes higher than 5000 feet (1500 meters) above sea level, have an authorized pressure washer dealer perform this carburetor modification.
∙Even with suitable carburetor jetting, engine horsepower will decrease approximately 3.5% for each 1000 foot (300 meter) increase in altitude. The effect of altitude on horsepower will be greater than this if no carburetor modification is made.
If a engine jetted for high altitude is used at a lower altitude, the lean air fuel mixture will reduce performance and may
the engine.
12

BEFORE USE
Attaching High Pressure Hose to Spray Gun
∙Pull slip ring on female
∙Insert male
∙Release slip ring on female
∙Pull high pressure hose and spray gun in opposite directions to ensure they do not separate.
Connecting Lance to Spray Gun
∙Thread lance on to spray gun.
Connect Hose and Water Supply to Pump
∙Attach high pressure hose to the high pressure outlet on pump as per attaching High pressure hose to spray gun. Be sure to pull on hose to be sure of tight connection.
∙Before connecting garden hose to water inlet, inspect the inlet screen. Clean screen if it contains debris or have it replaced if damaged. DO NOT run pressure washer if inlet screen is damaged.
∙Run water through your garden hose for 30 seconds to clean out debris before connecting.
IMPORTANT: DO NOT siphon standing water for the water supply. Water supply must be at 20psi, failure to do so will cause the pump to run dry and damage will occur voiding warranty.
Use cold water only (less then 50 Degrees Celsius).
∙Connect the garden hose (not to exceed 16 meters in length and with the ID no less then 13mm) to the water inlet. Tighten by hand.
∙Turn ON the water, squeeze the trigger to purge the pump system of air and impurities.
NOTICE
DO NOT attempt to crank or start engine, before it has been properly serviced and had the recommended oil added.
-There MUST be at least 3meters of unrestricted garden hose between the pressure washer inlet and any device, such as a vacuum breaker or check valve.
-Damage to equipment resulting from failure to follow this instruction will void warranty.
13

Getting Started:
Risk of eye injury.
Spray can splash back or propel objects.
-Always wear safety goggles when using this equipment or in vicinity of where equipment is in use.
-Before starting the pressure washer, be sure you are wearing adequate safety goggles.
-Never substitute safety glasses for safety goggles.
PRE START CHECKLIST
∙Once you reach this point ensure you have done the following:
∙All safety instructions read and understood
∙All hose connections are tightened and hoses free of kinks
∙Adequate amounts of lubrication and fuel have been added to the engine & pump drive, breath plug fitted to pump.
∙Water source connected and turned on; Note: cold water only
∙All operation instructions read and understood
*Pump oiled at factory – Replace transport plug with breather.
Preparation before starting:
∙Add SAE 30 oil (SAE 10W30 multigrade for cold climates) to the engine (1100ml) Note: There will be a residual amount of oil in the engine from factory testing
∙Check the engine has an adequate fuel supply (unleaded, regular gasoline)
∙Make sure that the work area has sufficient ventilation
∙Ensure the ignition cable is secured to the spark plug
∙Ensure water supply is turned on
1.Turn the fuel cock to the on position
2.Move the engine switch to the “on” position
3.Move the choke lever to the on position
ONOFF
TO START:
4.Pull the trigger gun lever, to prevent pressure build up within the pump while starting. For safety reasons ensure the nozzle is removed whenever starting the unit. Note * Failure to open the trigger valve while starting, may overload the recoil starter causing damage to the mechanism.
5.Engage the recoil starter by pulling the rope handle out 25 to 50mm (1 to 2”).
6.Then deliver a short sharp pull to crank the engine over. In general most units will fire and start on choke after two or three pulls. Do not let rope “snap back” against
starter.
7.Reduce choke as the engine warms up. The choke should be completely off after 2 or 3 minutes.
14

SHUT OFF PROCEDURE:
1.Release spray gun trigger and let engine idle for two minutes
2.Move the engine stop switch to the “stop” position. The engine will stop immediately.
3.Turn water supply off.
4.Turn Fuel Tap off.
5.Always point spray gun in safe direction, pull trigger to release retained high water pressure before undoing hose and trigger from pump.
The spray gun and hose traps high water pressure even when engine is stopped and water disconnected.
HIGH PRESSURE OPERATION:
Never pull the hose to move the unit. This could damage hose and/or pump inlet.
Never allow pump to run with water hose turned off or kinked. Shutting off the water supply to the pump while it is operating may cause serious pump damage.
Do not let hoses contact HOT engine muffler during or immediately after use, as this will damage the hose.
Interchangeable Nozzles :
∙Pull back the quick connect lock ring, firmly insert the desired nozzle and then release the lock ring.
∙Make sure the spray nozzle is properly locked in place with its quick coupler, if the collar is not (Forward) in the locking position, the nozzle may become a dangerous projectile. The
To prevent damage to your surface to be cleaned always start with lowest pressure nozzle size (white) and continue changing to the higher nozzle size until the best work result is achieved.
Pressure washer produces fluid pressures and velocity high enough to penetrate human and animal flesh which could result in series injury or amputation. DO NOT point pressure washer in direction of people or animals. High velocity fluid spray
can cause objects to break, propelling particles at high speeds.
15

(Red) |
(Yellow) |
(Green) |
(White) |
Explanation:
0° nozzle setting – A pinpoint stream. This nozzle stream is very powerful and covers a very small area of cleaning. Only to be used on surfaces that can withstand this high pressure (metal or concrete).
15° to 25° nozzle setting – Used for less powerful stream which can cover a wider area. This nozzle setting is also very powerful and should only be used on surfaces that can withstand this high pressure.
40°nozzle setting – Used for the least powerful stream and covers a wide area of cleaning. This nozzle setting should be used for most general cleaning jobs.
Pressure Adjustment:
The maximum working pressure is
Low Pressure Detergent Operation:
The Black Tip – will lower the pressure and allow chemical to be drawn through the downstream chemical injector.
∙Change the high pressure nozzle for the Detergent (Black) Nozzle. (Be sure the quick coupler is fully engaged before pulling the trigger)
∙The chemical injector will only work when this (black) nozzle is used.
∙Push the ¼” clear plastic hose to the inlet barb o f the chemical injector located near the high pressure hose connection (item 8, page 2).
∙Insert the loose end of the detergent pick up hose into the desired chemical.
Be sure to flush the injection system with clean water after use.
∙Place the chemical injector hose in a bucket of clean water and operate for one minute.
16

Rinsing Pressure:
Pressure Washer Rinsing
∙Remove black spray tip from lance.
∙Select & install desired high pressure spray tip following instructions in High Pressure Operation section of this manual.
∙Keep spray gun a safe distance from area you plan to spray.
∙Increase or decreases spray pressure by turning the Pressure Adjustment Knob, clockwise to increase or counter clockwise to decrease. Use lower pressure to wash items such as a car or boat. Use higher pressure to strip paint and degrease driveways.
∙Apply a high pressure spray to a small area and then check surface for damage. If no damage is found, it is okay to continue rinsing.
∙Start at top of area to be rinsed, working down with same overlapping strokes as used for cleaning.
Thermal Relief Valve:
During normal operation, the cold water from your water supply passes through the inside of the pressure pump allowing the pump to maintain a normal operating temperature. When you let go of the trigger, the pump enters
If the unit is left in the
Do not attempt to run hot water into the pump or allow your unit to operate in the
17

MAINTENANCE:
WHEN DOING MAINTENANCE, YOU MAY BE EXPOSED TO HOT SURFACES, WATER PRESSURE, MOVING PARTS, OR FIRE WHICH MAY RESULT IN SERIOUS INJURY OR EVEN DEATH. BEFORE PERFORMING ANY MAINTENANCE OR REPAIR, LET THE ENGINE COOL DOWN COMPLETELY AND RELEASE ALL WATER PRESSURE. THE ENGINE CONTAINS FLAMMABLE FUEL. DO NOT SMOKE OR WORK NEAR OPEN FLAMES WHILE PERFORMING MAINTENANCE.
Nozzle cleaning:
If the nozzle becomes clogged with foreign material, such as sand, flow will cease or become restricted. Clean the nozzle immediately using the nozzle cleaner supplied and the following instructions:
∙Shut off the pressure washer and turn off the water supply.
∙Pull trigger on gun handle to relieve any built up water pressure.
∙Remove the nozzle from the lance assembly.
∙Turn the nozzle end up.
∙The nozzle hole is approximately 1mm in diameter, it is the smallest hole in the system, even a single grain of sand can block the nozzle.
∙Clean the nozzle using the nozzle cleaner provided or wire of appropriate size. Insert into the nozzle end and push. Remember that any obstruction will have been lodged in place under very high pressure and may require an equal amount of force in the opposite direction to dislodge it.
∙It is important that you see the obstruction come out of the lance, otherwise the nozzle may block again.
∙Reconnect nozzle to lance and turn on water supply.
∙Recommence operation.
Water Inlet Screen Cleaning:
The water inlet filter screen should be checked periodically and cleaned whenever necessary.
1.Remove the water inlet hose connection to expose the inlet filter.
2.Remove the filter screen and flush with clean water from both sides.
3.Replace the cleaned filter screen into the water inlet connector.
4.Tighten securely (clockwise)
Do not operate the pressure washer without a water inlet filter installed.
Check High Pressure Hose:
The high pressure hose can develop leaks from wear, kinking or abuse. Inspect the hose each time before using it. Check for cuts, leaks, abrasions or bulging of cover, damage or movement of couplings. If any of these conditions exist, replace the hose immediately.
The high pressure stream of water that this equipment produces can cut through skin and its underlying tissues, leading to serious injury and possible amputation.
∙Never repair high pressure hose. Replace it.
∙Replacement hose rating MUST exceed maximum pressure rating of unit.
18

PUMP OIL MAINTENANCE:
CHANGING PUMP OIL
Change oil after first 50 hours of operation and then every 200 hours or 3 months, which ever occurs first. Note: When changing pump oil, use only high quality
CHANGE PUMP OIL AS FOLLOWS:
∙Clean area around brass oil drain plug at bottom of pump.
∙Remove oil drain plug. Drain oil completely into approved container.
∙When oil has completely drained, install oil drain plug and tighten firmly.
∙Clean area around pump breather plug. Remove breather and fill pump with 600ml of recommended oil. Make sure it shows halfway on sight glass, add more if necessary.
∙Wipe up any spilled oil.
Used motor oil may cause skin cancer if repeatedly left in contact with the skin for prolonged periods. Although this is unlikely unless you handle used oil on a daily basis, it is still advisable to thoroughly wash your hands with soap and water as soon as possible after handling used oil.
Please dispose of used motor oil in a manner that is compatible with the environment. We suggest you take it in a sealed container to your local service station or recycling center for reclamation. Do not throw it in the trash or pour it on the ground.
Before you store the pressure washer, make sure you do the following:
1.Remove fuel from engine or add fuel stabilizer, such as
2.If adding stabilizer, connect water supply and high pressure hose to pump.
3.Ensure water supply is turned on, start pressure washer and depress gun trigger to avoid running the unit in the
5.Disconnect spark plug wire and remove spark plug. Pour one teaspoon of engine oil into the spark plug hole. Place a rag over spark plug hole and pull rope slowly several times to lubricate cylinder, replace spark plug and lead.
6.Protect the high pressure hose, gun and wand from damage (such as being stepped on or run over).
TO PREVENT INTERNAL CORROSION OR FREEZING:
Items needed: 100cm piece of garden hose or equivalent and antifreeze (approximately 200 mℓ.)
1.To winterize the pressure pump, prevent the engine from starting by disconnecting the spark plug wire from the engine and remove high pressure hose from the pump. Add automotive antifreeze corrosion inhibitor through the water inlet, place the garden hose direct into the anti freeze container. Pull engine rope several times until antifreeze comes out of high pressure outlet connector. You have now displaced the water in the pump with corrosion inhibitor.
2.Remove all water from high pressure hose, gun, and wand. To do so, disassemble high pressure hose from gun. Drain all water from hose. Hold gun/wand assembly in a vertical position with the nozzle pointing down, and pull gun trigger to remove any water.
19

ENGINE MAINTENANCE:
WHEN DOING MAINTENANCE, YOU MAY BE EXPOSED TO HOT SURFACES, WATER PRESSURE, MOVING PARTS, OR FIRE WHICH MAY RESULT IN DEATH. BEFORE PERFORMING ANY MAINTENANCE OR REPAIR, LET THE ENGINE COOL DOWN COMPLETELY AND RELEASE ALL WATER PRESSURE. THE ENGINE CONTAINS FLAMMABLE FUEL. DO NOT SMOKE OR WORK NEAR OPEN FLAMES WHILE PERFORMING MAINTENANCE.
1.If the engine can not be started or starting is difficult, first check whether the fuel system has fresh fuel and adequate oil level.
2.Secondly check the spark plug. Remove the spark plug cap, take out the spark plug, clean any carbon deposits and adjust the plug gap to specified gap and reassemble.
3. As well you should ensure that the inlet of the air filter and exhaust outlet are clean. Maintain a clean air filter. Inspect regularly and clean or replace as necessary.
Check the air filter
∙Unfasten the butterfly nut, open the filter cover, and remove the filter element. (Never wash the paper element by using any detergents). The paper element may be partially cleaned by using gentle air pressure. According to the specifications or whenever engine output is reduced or the exhaust gas is no longer clear, replace the filter element.
∙After mounting the filter core, cover the air filter housing and fasten the butterfly nut.
∙Never start the Pressure Washer without the air filter element.
Note* Dusty conditions will require high filter maintenance.
20

ENGINE TROUBLE SHOOTING GUIDE
When the engine will not start:
Is there |
fuel in |
|
the tank? |
|
NO |
|
YES |
|
Refill the fuel tank
Is there oil in the engine?
YES
Is there a spark from the spark
NO
|
|
Add the recommended |
||
|
|
oil. |
|
|
|
|
|
|
|
Replace the |
|
|
Take the engine to |
|
Still no spark |
|
an |
authorised |
|
Spark plug. |
|
|||
|
|
|
|
|
plug?NO
YES |
 Be sure there is no spilled fuel around the spark plug.
Spilled fuel may ignite.
service dealer. |
To check:
1)Remove the spark plug
cap and clean any dirt from around the spark plug.
2)Remove the spark plug and install the spark plug in the plug cap.
YES
Is the fuel reaching the carburetor?
YES
NO
3)Set the plug side electrode on the cylinder head.
Clean the fuel sediment cup
To check:
If the engine still does not start, take the engine to an authorised service dealer.
1)Turn off the engine switch and loosen the drain screw.
2)Fuel should flow from the drain when the fuel tap is turned on.
DRAIN SCREW
21

PUMP TROUBLE SHOOTING GUIDE
|
PROBLEM |
|
CAUSE |
|
|
|
CORRECTION |
|
|
|
|
|
|
|
|||
|
|
1. |
Low pressure Nozzle (Black) |
1. |
See Nozzle Selection. |
|||
|
|
|
not fitted. |
|
|
2. |
Clean filter. |
|
|
|
2. |
Chemical filter clogged. |
|
3. |
Ensure end of chemical hose is fully |
||
|
|
3. |
Chemical |
filter |
not |
in |
|
submerged into chemicals. |
|
Pump will not draw |
|
chemical. |
|
|
4. |
Dilute chemical. Chemical solutions |
|
|
4. |
Chemical solution too thick. |
|
should have same consistency as |
||||
|
Chemicals |
|
||||||
|
5. |
Pressure hose too long. |
|
|
water. |
|||
|
|
|
|
|||||
|
|
6. |
Chemical |
5. |
Lengthen water supply instead of |
|||
|
|
|
injector. |
|
|
|
pressure hose. |
|
|
|
|
|
|
|
|
6. |
Have parts cleaned or replaced by |
|
|
|
|
|
|
|
|
authorised dealer. |
|
No or low pressure |
1. |
Worn seal or packing. |
|
|
|
||
|
2. |
Worn or obstructed valves. |
|
Have parts cleaned or replaced by |
||||
|
(after period of |
3. |
Worn unloader piston. |
|
|
|||
|
|
|
authorised dealer. |
|||||
|
normal use). |
4. |
Worn |
|
|
|||
|
|
|
|
|||||
|
|
|
|
|
|
|
||
|
Water leaking at |
1. |
Worn or broken |
|
1. |
Check and replace |
||
|
spray gun/lance |
2. |
Loose hose connection. |
|
2. |
Tighten hose connection. |
||
|
connection. |
|
|
|
|
|
|
|
|
|
|
|
|
|
|
||
|
|
1. |
Loose connections. |
|
1. |
Check and replace |
||
|
|
2. |
Pistons packing worn. |
|
2. |
Tighten hose connection. |
||
|
Water leaking at |
3. |
Worn or broken |
|
3. |
Tighten all connections. |
||
|
4. |
Pump |
head |
or |
tubes |
4. |
Have parts cleaned or replaced by |
|
|
pump. |
|||||||
|
|
damaged from freezing. |
|
|
authorised dealer. |
|||
|
|
|
|
|
||||
|
|
|
|
|
|
|
|
|
|
|
1. |
Oil seals worn. |
|
|
1. |
Have parts cleaned or replaced by |
|
|
|
2. |
Loose drain plug. |
|
|
|
authorised dealer. |
|
|
|
3. |
Worn drain plug |
|
2. |
Tighten drain plug. |
||
|
|
4. |
Worn fill plug |
|
3. |
Inspect and replace |
||
|
Oil leaking at |
5. |
Pump overfilled. |
|
|
4. |
Check for correct amount of oil. |
|
|
pump. |
6. |
Incorrect oil used. |
|
|
5. |
Drain and refill with correct type and |
|
|
|
7. |
Vent plug clogged. |
|
|
|
amount of oil. |
|
|
|
|
|
|
|
|
6. |
Clean vent plug, use air hose to free if |
|
|
|
|
|
|
|
|
blocked, if problem persists replace |
|
|
|
|
|
|
|
|
vent plug. |
|
Pump pulsates. |
|
Nozzle obstructed. |
|
See “ Nozzle Cleaning” section |
|||
|
|
|
|
|
|
|
|
|
22

Limited Warranty Policy
Austech Industries Pty Ltd A.B.N. 19 010 548 464 23 Iris Place, Acacia Ridge, 4110
PO Box 715
Archerfield Qld 4108 |
|
Brisbane Australia |
|
T: (07) 3723 1500 |
F: (07) 3723 1555 |
This Limited Warranty applies only to new products* distributed by Austech Industries Pty Ltd (“Austech Industries”). It is a condition of this Limited Warranty Policy that the purchaser read the owner’s manual for the product and only use the product to the extent or for the purposes stated therein. The purchaser must also ensure that all servicing requirements are completed as listed in the owner’s manual (said servicing is at the owner’s expense). We recommend that all servicing is completed by an authorised service agent and that records of said servicing are retained by the purchaser as proof in the event of a warranty claim.
Whilst the owner’s manual, packaging, and/or other documentation supplied with Austech Industries’ products may provide details in respect of a Limited Warranty, the terms set out herein supersede these matters, and this Limited Warranty applies in their place. This warranty is no less advantageous than otherwise described in such other documentation.
Austech Industries agrees, subject to the terms and conditions specified below, to repair or replace at Austech Industries’ cost, the product purchased by you when the product does not perform in accordance with its specifications during the limited warranty period, due to any fault in manufacturing, materials and/or workmanship. Austech Industries is not liable to repair or replace products that the purchaser uses in a manner that is inconsistent with the owner’s manual or in the circumstances set out in paragraphs 1.1 – 1.7 below.
The benefits to the purchaser under this warranty are in addition to other rights and remedies under the Competition and Consumer Act 2010 (Cth).
The limited warranty period, within which a defect in the product must appear, commences from the date of purchase and ceases on expiration of the specified term below.
The Limited Warranty Period
SP Jetwash Pump Warranty - 24 months |
Torini Engines - 36 months |
Accessories – 12 months |
The purchaser’s attention is drawn to the following
1.To the extent permitted by law and subject to this Limited Warranty, and as part of the terms of the sale of the equipment or part thereof: Austech Industries shall not be liable for any form of loss, damage, cost, injury or harm of any kind (whether direct, indirect, special or consequential) howsoever arising from the use or supply of the equipment to the purchaser.
Exclusions to Limited Warranty Policy
This Limited Warranty will not apply where the equipment or any part thereof:
1.1Fails due to an accident (including liquid spillage), abuse, misuse, neglect or normal wear and tear;
1.2Has been used in a manner other than for which it was originally designed;
1.3Has been tampered with or is otherwise than as supplied by Austech Industries;
1.4Where any damage, malfunction or other failure of the equipment or any part thereof resulted directly or indirectly from unauthorized persons, adjusting or failing to adjust any part requiring normal maintenance and service (examples include adjustment of tappets, air filter maintenance, lubrication and tightening of screws nuts and bolts);
1.5Malfunctions due to the use of defective or incompatible accessories;
1.6Is damaged by lightning or thunderstorm activity; or
1.7Has been transported to a country where no authorised Service Agents exist.
Claiming warranty
This Limited Warranty may be claimed on in the following manner:
2.1In order to make a claim under this Limited Warranty, the purchaser must deliver the equipment or any part thereof to an Austech Industries authorised repair agent and pay all costs of transportation and all costs incidental to making a claim under this Limited Warranty. The purchaser must first contact Austech Industries (contact details described above) and request the delivery address of an Austech Industries authorised repair agent.
The purchaser must deliver to the repair agent written reasons why the purchaser considers that the purchaser
2.2has a claim under this Limited Warranty and must provide all necessary details, including:
∙The place, date and from whom the unit or part was purchased.
∙The unit or part involved, Model and Serial Number.
∙The defect, malfunction or failure in respect of which the claim is being made.
∙Proof of service of the unit or part (if applicable)
∙Proof of purchase in respect of the unit or part.
2.3If the Limited Warranty claim is valid, the repair agent will carry out repairs and return the product at no charge to the purchaser. These repairs are limited to the Limited Warranty fault identified and as such will not include any other faults due to misuse, abuse, failure to maintain, fair wear and tear or the replacement of serviceable items such as oil, spark plugs, air filters, fuel etc.
Our goods come with guarantees that cannot be excluded under the Australian Consumer Law. You are entitled to a replacement or refund for a major failure and for compensation for any other reasonably foreseeable loss or damage. You are also entitled to have the goods repaired or replaced if the goods fail to be of acceptable quality and the failure does not amount to a major failure.
* SP Jetwash and Torini are brand names of products distributed by Austech Industries
Note # Units which are failing to perform in accordance with specifications due to

36 Month or 3 year Limited Extended Engine Warranty:
2.The 36 Month, Limited Extended Engine Warranty applies only to the original purchaser of Torini Engines distributed by Austech Industries. The Limited Extended Engine Warranty period commences from the date of purchase and runs in conjunction with the standard 12 months Limited Warranty for the pressure washer. It is a condition of this Limited Extended Engine Warranty Policy that all servicing requirements are completed as listed in the Owners Manual.
3.To the extent permitted by law and subject to the Limited Warranty, and as part of the terms of the sale of the engine or part thereof: Austech Industries shall not be liable for any form of loss, damage, cost, injury or harm of any kind (whether direct, indirect, special or consequential) howsoever arising from the use or supply of the equipment to the purchaser.
∙ Scope of coverage: - 36 Months (3 years)from date of purchase
a)The Limited Extended Engine Warranty covers the following specific parts only: the cylinder head, cylinder block crankshaft, connecting rods, piston, flywheel, camshaft and timing gears. The Warranty Period for both the standard 12 month limited warranty and the limited extended engine warranty begins on the date of purchase to the original retail purchaser and is valid only until the applicable warranted period has passed.
Company responsibilities:
4.Austech Industries agrees, subject to the terms and conditions specified, to effect warranty repairs within a reasonable amount of time (30 days) at no charge to the owner, the engine purchased by you when the above specified engine components fail to perform in accordance to specifications due to any fault in manufacturing, materials and/or workmanship, during the 36 Month Limited Extended Engine Warranty period.
The owner’s responsibilities:
As the engine owner, you are required to carry out the maintenance and servicing requirements as listed in your Owners Manual (said servicing is at the owner’s expense). We recommend that all servicing is completed by an authorised service agent and that records of said servicing and scheduled maintenance are retained by the purchaser as proof in the event of a warranty claim. In the event of a claim, you (the owner) are responsible for presenting your engine to a service dealer for inspection as soon as a problem becomes evident.
Exclusions to Limited Extended Engine Warranty Policy:
This Warranty does not cover the cost of shipping the product to or from the Warranty repair facility.
This Warranty does not cover the cost of parts and / or labor necessary to carry out normal servicing or maintenance. The Limited Extended Engine Warranty Policy will not apply where the engine or any part thereof:
1.1Fails due to an accident (including liquid spillage), abuse, misuse, neglect or normal wear and tear.
1.2Has been used in a manner other than for which it was originally designed.
1.3Has been tampered with or is otherwise than as supplied by Austech Industries.
1.4Where any damage, malfunction or other failure of the equipment or any part thereof resulted directly or indirectly from unauthorized persons, adjusting or failing to adjust any part requiring normal maintenance and service. Examples include adjustment of tappets, air filter maintenance, lubrication and tightening of screws nuts and bolts.
1.5Malfunctions due to the use of defective or incompatible parts or accessories.
1.6Is damaged by acts of God, Lightning or thunderstorm activity.
1.7Has been transported to a country where no authorised Service Agents exist.
Our goods come with guarantees that cannot be excluded under the Australian Consumer Law. You are entitled to a replacement or refund for a major failure and for compensation for any other reasonably foreseeable loss or damage. You are also entitled to have the goods repaired or replaced if the goods fail to be of acceptable quality and the failure does not amount to a major failure.
This Warranty does not cover consumable parts such as, but not limited to, fuel, filters, belts, hoses, lubricants and cleaning fluids.
24
SP Jetwash Petrol Pressure Washer Powered By Torini Engines

Write Your Own Review
NEED ANSWERS
Pickup In Store
Norva Tools is one of Melbourne's renowned trade tools stores, and no matter what your tools requirements are, we have you covered. If you don't want to pay for delivery or need your items ASAP, you can pick it up from our tools warehouse in Dandenong, Melbourne. Just bear in mind not all items are in stock. You'll be able to see if they do during the checkout process.
Estimated Delivery Timeframes
If you opted to collect your items, you will receive an email to inform you when your goods are ready for collection.
If you opted for delivery, you will receive an email when the goods have been despatched to the couriers with details so you can track our order.
We aim to despatch all orders within 1-2 business days. In the unusual event of a delay to the dispatch of your order, you will be contacted at the earliest opportunity. Once the order has been despatched the estimated delivery time is as follows:
- Metro (Excludes Hobart Metro) 1-2 business days
- Hobart Metro 3-4 business days
- Regional Areas 3-4 business days
- Remote Areas 6-9 business days
Please note that these delivery timeframes are estimates and are not guaranteed.
Returns
Changed your mind? No worries. You just need to get the product back to us within 14 days, unused and in its original packaging and we'll give you a refund (excluding delivery costs). You can read our full returns policy here (special order items are excluded from this returns policy).
The information below is required for social login
Sign In
Create New Account